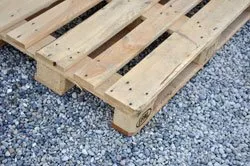
Stylish garden furniture can be made from simple Euro pallets with a bit of craftsmanship. This is how you build your garden table from Euro pallets yourself!

New from old - upcycling is the name of the new trend. So there is no recycling here, but upgrading again. The result is unique pieces of furniture with a special rustic charm. (More about this trend here)
Anyone who spends a lot of time on interior design blogs or constantly leafing through interior design magazines will certainly not be unfamiliar with this trend. Tables, benches, lounge furniture, shelves, cupboards or accessories - with a little manual skill, you can conjure up everything from Euro pallets.
The garden table is particularly suitable for beginners. The assembly is easy and does not take unnecessarily long. If you end up proud of your do-it-yourself garden table, you should include it in your interior as a special focal point.
» My tip: This new garden table comes into its own when it is staged with the right seating. For example, wicker furniture or sturdy teak wood furniture go perfectly with this table (both seen at www.freizeit-shop24.de). These materials are durable, easy to care for, 100 percent weatherproof and offer a high level of seating comfort. (Reading tip: Making garden furniture winter-proof - care and tips for storage)
Build your own pallet table - Here's how
❒ find euro pallets
There are many pallets. Euro pallets of this kind are very common, especially on building yards and in agriculture. Just take a look around in your area. Aren't there some locations where the pallets are stacked meters high? Here you can be lucky enough to get Euro pallets relatively inexpensively. Just ask.
Various classifieds portals also offer Euro pallets for self-pickup. The prices here vary greatly, but average around 10 euros per pallet.
❒ Material
- 2 euro pallets
- 1 thin Plexiglas plate
- 4 swivel castors preferably with parking brake
- 4 small anti-Slide Discs
- Wood screws to mount the rollers
- Wood stain
- Brushes
- Sandpaper
- Grinder
❒ Instructions
➤ Step 1: Pre-treat the Euro pallet
First you have to sand the Euro pallets properly. This is important so that you don't get any splinters later. In addition, the paint will hold better later on the boards. It's best to use a grinder, it's quicker and easier. However, it is best to use sandpaper on the corners at the end, as these areas are difficult to reach with the machine.
» Tip: Then, as a test, run your flat hand over the beams and check whether there are any splinters of wood sticking out.
➤ Step 2: Connect the two pallets
A pallet is so heavy that it doesn't even slip easily. But if it is safer if the two are screwed together, you should make wooden straps at this point.
To do this, take a roof batten and saw four wooden flaps of the same size. However, measure in advance exactly how big they need to be.
Now you can connect the palettes together. To do this, place the Euro pallets with their feet on top of each other, add a wooden strap to each corner and screw them together with the appropriate screws. A cordless drill is best for this. You'll be done with this task quickly and without much effort.
If you want, you can use just one pallet for the table. Then you can ignore the second step.
➤ Step 3: Painting palettes
Now color finally comes into play. You can decide for yourself which color or glaze you use. In order to preserve the grain, it is recommended that you only apply one coat. Paint the large areas with a wide roller and the corners with an appropriate brush. You should let the paint dry overnight.
» Tip: It is best to paint your new garden table outside in the fresh air or in a well-ventilated room. This way the paint dries faster and it is always he althier.
➤ Step 4: Attach the wheels
Now you can attach the wheels. To be able to move the table back and forth later, you should use castors with parking brakes. I found roles that are even suitable for lawns on Amazon.de. At the same time, they also provide sufficient load capacity. So you don't need anyAfraid that the table will collapse under the rollers.
Simply screw the rollers to the bottom corners of the Euro pallet and you're done. It is best to use special wood screws that have a sharper tip and do not splinter the wood when fastening.
➤ Step 5: Attach the plexiglass plate
If you don't want small parts to keep falling into the cracks of the euro pallet, you should put a pallet on the top pallet Bring Plexiglas plate. Simply place a small anti-slip disc in the corners and then put the plexiglass plate on top.
Your new garden table in a very special design is ready.
In this video, the exact procedure is explained to you in detail. It's worth a look!
» My tip: The garden table looks even more impressive with individually made drawers. Just take the exact measurements and get started.