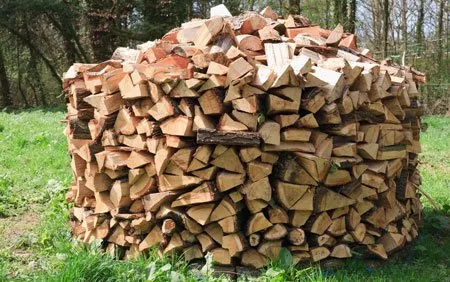
If you want to have enough dried firewood in winter, you have to stack it optimally. Important tips and 2 decorative stacking ideas can be found here.

When it slowly gets cooler outside, the beloved fireplace comes into play again. Year after year, fireplace owners meet in the forest and cut their own firewood - of course only with prior approval and a chainsaw license. You can find more information on this at forstschule.com.
You should not immediately use the freshly cut wood for heating. It's still too wet. Damp wood burns worse and does not give off a large calorific value. If you let the wood sit for about one to two years, the wood should then have a residual moisture content of 15 to 17 percent. If you are not sure, you can also buy a wood moisture meter (cheaply available here at Amazon) and quickly measure the moisture in the wood.
In order for the wood to dry properly in the first place, it has to be stacked optimally. (Reading tip: Storing firewood - tips & ideas)
➼ The right place
If you think the small room in the basement is a suitable place to dry and store your wood, you are wrong. Of course, the wood is optimally protected from wind and weather there, but wood needs sufficient air circulation to dry and this is only guaranteed to a limited extent in the cellar.
A place where the wind can blow through is ideal, but where you can protect the wood from moisture from above with a tarpaulin.
➼ Optimal surface
You shouldn't simply stack the wood on the lawn or on the ground. A certain degree of protection against moisture must also be provided from below so that the wood does not become moldy. Pallets and boards are best suited as a base here. Many larger construction and landscaping companies have a variety of pallets. Just ask around to see if you could buy some there. The prices are around 10 euros each.
Thanks to the great demand for furniture made from Euro pallets, you can also find suppliers on ebay who sell their pallets for a small thaler.
➼ Log Size
You're best stackedFirewood if everything is roughly the same size. It also dries faster when the wood has already been split. (Reading tip: splitting wood - you should pay attention to that).
The easiest way to split the wood without much effort is to use a log splitter. But if you still want to train your muscles and have the necessary time, you should rather use an axe. The axes from Fiskars are particularly recommended here. (various models and sizes cheap at Amazon)
➼ Stacking wood correctly
➔ Step 1: Start with the bottom row and place one log next to the other. Do this over the entire width, as space allows.
➔ Step 2: Stack the second row as follows: Begin again at the beginning and now place the wood across from the back to the front. This creates a stable framework that will not easily fall over again.
You can also lay the beginning and the end with these crosspieces. This is completely sufficient for pieces of wood of the same size. In the case of stacks of wood that are very wide, you should lay some more across the middle to ensure a secure hold. Even with uneven logs, it is important that you rely on a stable framework. It would be annoying if the whole load collapsed in the end.
» My tip: There are now special stacking aids that can be adjusted in height and width. These offer a secure hold, especially on the outer edges.
➼ Stack wood decoratively
Round stack (timber heap)
A round pile not only looks incredibly stylish on a spacious property, it is also practical. Lots of wood can be accommodated decoratively here.

Here you must first create a waterproof base so that no moisture can pull up from the ground. Plastic tarpaulins are best suited here (available in every hardware store). Use an old knife to poke a hole in the foil every few centimeters so that the water can drain off and no waterlogging forms.
➤ TIP
Make sure that the wood stack inclines slightly inwards towards the top. This prevents it from collapsing.
Now lay out logs that are not too thick in a circle on the tarpaulin lengthways to the middle. This will form the outer edge. Now you can work your way up. The resulting cavity is then chopped at the same timeFirewood filled.
At a height of about half a meter you should inspect your building from afar. Consider adding a smooth middle layer of planks at this height to give the stack additional support.
Finally, you should put on a tarpaulin to protect against moisture.
» Tip: You can decorate protruding logs with colorful wind chimes or bird feeders.
Mixed wooden wall
You haven't just decided on beech or pine, but instead collect all the wood for your fireplace? Then you can also build a colorful mixed wooden wall. To do this, sort your wood into different piles.

Then consider whether you want to put any patterns or motifs on the wall. Here it can help to make a small sketch in advance - preferably as true to scale as possible. Now start laying out the individual logs according to the sketch.
It also looks very decorative if you stack a few rows of beech and then a few rows of different branches that have accumulated. This is followed by a few more rows of logs.
There are no limits to your imagination. Just try something new and enjoy the envious looks of the neighbors after your hard work.