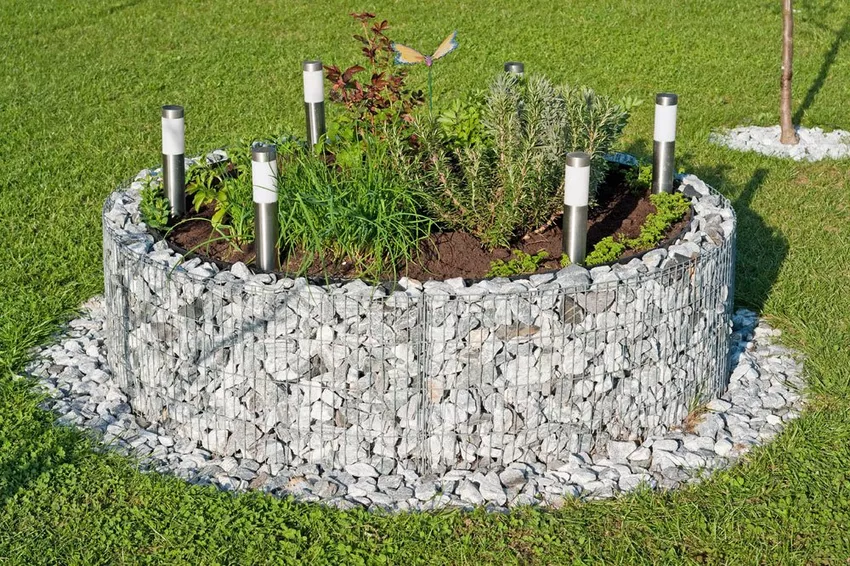
For many, gardening is more than just a hobby. Unfortunately she goes on her back. Raised beds can help. Currently trendy: gabion raised beds.

Anyone who owns a garden usually also grows fruit, vegetables and herbs. What used to be just a way of always having fresh groceries in the house has now become a true passion for many. While some moan and nag when they have to prepare the garden, others are happy when they can finally dig in the garden again.
Let's be honest: sometimes it's a bit tedious and difficult to get your garden in shape, but when you're rewarded with fresh food and beautiful plants, then the work is really worth it, right? Bending and squatting down when weeding, planting and harvesting can get on your back and knees and spoil the joy of gardening. But of course there is a solution to this problem. It's called a raised bed.
What is a raised bed?
A raised bed is a structure made of wood or stone, similar to a flower pot, but much larger and higher up. Those who create such beds no longer have to worry about back pain and aching knees. You can get some inspiration for a raised bed at Deavita.com, for example. Otherwise, raised beds made of gabions are very trendy at the moment. These are wire baskets whose walls are filled with stones. The great thing: setting up a gabion raised bed is child's play.
Building a gabion raised bed is so easy
You can buy everything you need to set up a gabion raised bed today as a complete set. When I was looking for a suitable supplier, I saw that you can buy appropriate gabions at Gabiona.de. Here you will find raised beds with different dimensions. And the good thing: Here you can also watch a suitable video guide that shows how the gabion raised bed is set up correctly. Otherwise everything is explained here step by step in writing.
➥ Step 1:
Whether you sign up for around or a rectangular raised bed made of gabions: the first thing you have to do is mark out the base area with a guide line and pegs. Then remove the soil about 10 cm deep.
Little tip:
If you want to protect your raised bed from possible mole and vole attacks, then it is best to lay out wire mesh at the bottom of the bed. Reading tip: Drive away the mole - 3 tips.
➥ Step 2:
You can then assemble the wire baskets or frames. Always start with the inside first. Assembling is also really easy. Take two parts that belong next to each other and connect them using the spirals provided. You simply have to screw these in clockwise on the outer edges of the grid parts.
➥ Step 3:
Once the inner basket is assembled, line the inside (not the bottom!) with fleece and secure it at the top with some clothespins. Then insert the supplied spacers inside the basket. To do this, simply cut small slits in the fleece with a cutter knife and insert the spacers. This gives the inner basket more stability.
➥ Step 4:
Then assemble the outer basket and then connect it to the inner basket using the spacers. This will keep the baskets in shape later.
➥ Step 5:
What the gabion raised bed is still missing are the stones. Here you can decide for yourself which ones you take. It is only important that the stones are not too small, otherwise they would fall through the mesh. How about granite, bas alt or limestone, for example? If you like it unusual, you can also fill the gabions with glass chunks. They are absolutely color stable (even in extreme outdoor weather) and make the raised bed a real eye-catcher in the garden. At Glasbrocken.com you can buy such glass stones, e.g. in different shades of blue and green, amber, black and clear - and in different grain sizes.
If you have decided on stones or glass chunks, then you can start filling. Always make sure that there are as few gaps as possible between the stones.
Tip: Combine the glass chunks with LED bulbs and your gabion will become a real highlight even in the dark.
➥ Step 6:
The raised bed is now almost ready. All you have to do now is fill and plant the inner part. For this you need to know that a raised bed is alwaysconsists of five different layers. Fill it layer by layer like this:
- Wood waste (shrub and tree cuttings)
- Green waste, leaves
- Damn
- Mixture of soil and compost
- nutrient rich soil
Once that is done, you can plant your raised bed with flowers, fruit and vegetables or herbs as you wish.
For those who don't read, here's the instruction video:
By loading the video, you accept YouTube's privacy policy.
Learn more
Load video
Always Unblock YouTube